


Welcome to the ESO Halls of Fabrication Trial Guide. This Halls of Fabrication Guide will teach you all the basics that you need to complete the trial! Halls of Fabrication is also often referred to as HOF.
Story: Ancient and deadly clockwork automata are spilling forth from a mysterious magicka conduit, and you and your companions must enter the rift, discover the Clockwork City’s Halls of Fabrication, and shut down the Assembly General. In the Halls of Fabrication, you and your team will uncover the secrets of Sotha Sil’s experiments and put an end to the Fabricant threat. You will not be alone, however, as you will be assisted by the mysterious and powerful Dunmer sorcerer Divayth Fyr himself!
Table of Contents:
- Raidsetup
- First Boss Hunter Killers
- Second Boss Pinnacle Factotum
- Third Boss Archcustodian
- Fourth Boss Reassembly Commitee
- Endboss Assembly General
- Endboss Hardmode
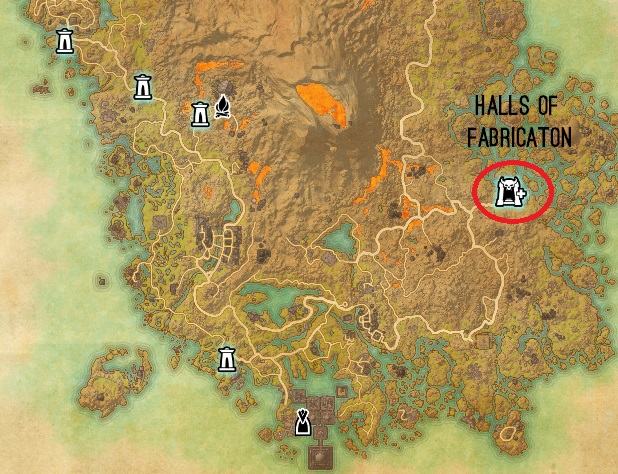
The Halls of Fabrication Trial can be found on the east side of Morrowind, to access it you require the Morrowind DLC.
Video Guide
You can also watch the video guide that was made when the trial launched, it shows all the mechanics in detail.
Raidsetup for Halls of Fabrication
2 Tanks, 2 Healers, 8 DDs. If your group is new I highly recommend running at least 1 Damage Dealer with the Kagrenac’s Hope set. This will make ressing allies a lot easier, because in Halls of Fabrication there is a lot of things that can kill you.
I also highly recommend that the tanks run high health builds, similar to the Catalyst tank build on my website.
First Adds in Halls of Fabrication
Right at the beginning you will encounter some trashmobs which are pretty easy to kill, just make sure not to stand in the charge attack of the Kagouti, it will oneshot if you do not block. On top of the hill you will have the first real trashpack encounter. The dead Centurion in the middle will revive some Spheres, there is a total of 2 waves. Make sure to interrupt the Spheres when they are charging up their attack, if they are not interrupted fast enough the group will take a lot of damage. After that you can walk down the hill again and you will encounter some more Kagoutis and Spheres and then you are already on the first boss.
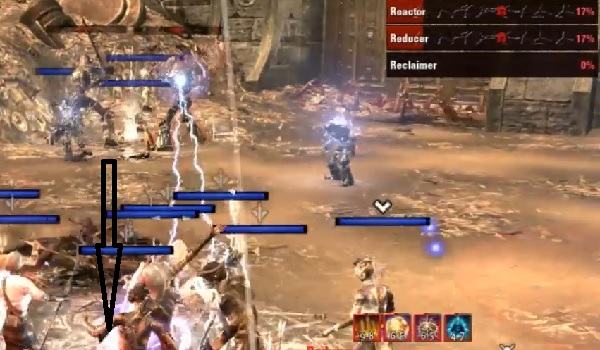
First Boss
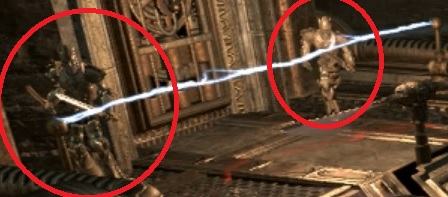
Hunter-Killer Negatrix & Hunter-Killer Positrox [HP: 2x 28,5 Mio.]
There is some very specific mechanics that you need to know to beat this boss. And there is also quite a few ways to actually kill it. Each tank has to tank one of the bosses. Now the most important thing is, they can not be connected for too long. If you have them connected for over 10 seconds their damage will scale higher and higher and eventually oneshot people. You need quite a lot of people with the Purge skill, as you can cleanse a lot of the enemies DoTs from you!
We basically have each boss on a side, so left and right side with each 6 players (4 DDs, 1 Healer, 1 Tank). Tanks then need to coordinate their bosses so when a sphere spawns, that you can break the shield of the sphere and one of the groups can kill the sphere. If you keep killing the Spheres you will not get any enrage phase. Just make sure to be careful when the adds spawn, those little mobs can hurt quite a lot, but they can be rooted with Talons for example. Damage Dealers and Healers need to make sure to not stand between the two bosses, as they shoot sparkles over to the other group. Plus if the beam hits you, then you are pretty sure ripperoni pepperoni.
Boss Mechanics
- Electric Beam
- This is a pretty basic but the most dangerous mechanic. If the bosses are connected for a certain time, they will oneshot almost everything. So make sure to never have them connected for over 10 seconds.
- Players can also not stand in the beam as it basically hits you for 10k per second so it will pretty much oneshot you. So make sure never to stand between both bosses, because sometimes the boss moves a bit around and might get connected for a split second and then the beam is going to hurt.
- Shock field
- The Boss will place a shockfield under the tank, it deals an insane amount of damage, so nor the tank and the group can touch it. It is pretty easy to avoid as it is stationary.
- Sparkles
- This is the most dangerous mechanic for the group as it deals quite a lot of damage, it is random.
- The boss will weave his tail and sparkles will come out, they are slow moving balls that will stun everyone that is being hit.
- You can reduce the damage of the sparkles if you block it, you will also avoid getting stunned this way.
- It will also leave a DoT on you that deals a small amount of damage, it is purgable.
- Bleed & Heal debuff
- The Boss puts a nasty bleed & healdebuff on the tank, you have to make sure that your healers apply enough heals to heal through or purge it.
- Headbang (Tankstun)
- From time to time the Boss will knock the tank on the ground and someone else has to interrupt the Boss, otherwise the tank will die after like 3-5 seconds.
- You can block this mechanic when you know the animation of the attack.
- Spheres

- The Spheres that will spawn after some time are the groups biggest enemy, as they are constantly applying poison DoTs on the players.
- The Poison DoT has an instant direct damage hit and then applies a DoT on you.
- The Poison DoTs can be cleansed, so I recommend at least 3-5 Players in the group that slot Purge and use it every few seconds as there will be a lot of Poison DoTs!
- In Addition to that, they also have a Snipe attack which oneshots most players, it is dodgeable and interruptable.
- Make sure to have 2 DDs assigned to interrupt the Spheres Snipe attack with Crushing Shock.
- Once 8 Spheres spawned, they will automatically enrage. Once they enraged their Snipe will charge faster, which means your DDs have to be faster with interrupting.
- Firebugs
- From time to time firebugs spawn, make sure to pull them to the group and AoE them down as fast as possible, I also recommend blocking for the time being as they deal quite some damage.
- Enrage
- Once one of the bosses is dead, the Spheres will enrage and it is very important that one of the Healers or DDs keeps using Purge every 2 seconds as the Poison DoTs will deal immensely more damage.
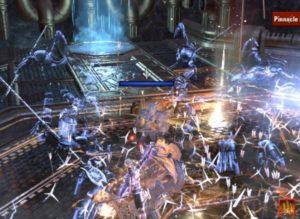
Second Bossfight
Pinnacle Factotum [HP: 51,7 Mio.]
The second bossfight starts almost after the first one is dead. You have to kill some trashmobs and then the second boss is going to spawn in the middle of the room. This is one of the more challenging bosses in this trial, it will take time to get used to the mechanics. Spread out around the boss, avoid unnecessary damage. As soon as the add spawns it will be tanked near the boss, DDs still focus on the boss and the Centurion will die from the AoE. If not enough AoE dps then make sure to have your ultimates ready when the add spawns or focus it down. 30 seconds into the fight the NPC will shout to go upstairs. 4 DDs with shield and self-heal use the portals on the edge and teleport up, so make sure you assign a DD to each platform before you start the fight.
Players left downstairs damage the boss and kill the Centurions and Conduits.
Boss Mechanics
- Heavy Attack with Staff

- Damage on tank, spawns sparkles around the boss.
- Amount of damage the sparkles deal is not that big if you block them.
- Streak & Liquid Lightning
- Streaks to a random person, leaves a big, heavy hitting Liquid Lightning on the ground.
- Do not stand in there for more than 1 second, otherwise you are going to get instantly grilled.

- Knockback
- Swings his staff in a huge cone AOE, if you do not block it you will get knocked back and get a lot of damage.
- Staff Beam that targets 4 players
- Lightning Staff heavy attack on multiple targets, deals damage and drains magicka.
- The last tick stuns the 4 players and deals damage.
- can be interrupted.
- Shock Meteors
- From time to time Shock Meteors will fall down from the ceiling. They are easy avoidable.
- They do true damage, so you can not shield through the damage, if 3 of those hit you, you are going to die, no matter how much health you have as they deal damage based on % health.
- Centurion
- First activates 6 seconds into the fight, then one more every 60 seconds. Doesn’t die, just deactivates.
- Steam every 30 seconds, the steam deals an insane amount of damage so make sure to stay out of range while he does this.
- If you get hit by the steam you also get a healing debuff which can stack up to 10 times, which causes you to basically get 0 healing received, especially the tank has to be careful.
- The Centurion also does a Heavy Attack which hurts a lot. So tank has to make sure to have enough health to be able to block it.
- When noone is in close proximity of the Centurion, the add will start spinning around and deal damage, if someone gets close the add will stop doing it.
- Shades (from 75% health)

- Every 40-45 seconds Boss disappears and gets replaced by 4 shades standing around the tank. Tank is not allowed to move, stands on a small green area.
- One after the other one Shade gets active (look out for the animation), and uses a shockwave on the tank. The tank has to block and *face* the shockwave, otherwise he gets a stacking bleed and the shockwave itself will kill everyone in its range.
- Sharpened Conduit (from 60% health)
- Conduit spawns that will drain your magicka
- Spawns randomly over the arena.
- Two Damage Dealers have to focus it so it dies as fast as possible.
- Charged Refabricated Centurion – (from 40% health)

- Activates every 30 seconds, “decharges” himself and dies eventually.
- Lightning Spin which is a Heavy hitting AoE spin.
- A DD can slot taunt and kite this centruion around the edge of the arena and it will eventually die as it basically kills himself.
- Or the off-tank can take the Charged Refabricated Centurion and the main-tank can take the boss + the normal centurion.
- Upstairs (4 DDs have to go up through the portals)
- Mechanic happens every 90 seconds.
- 60 Seconds time to kill all 4 Spheres upstairs and activate the buttons.
- All buttons have to be pressed at the same time, if you fail to do so everyone will die after 60 seconds.
- The Platform have shockfields, so make sure to have a Shield when you go up.
- Make sure 1 DD also has Elemental Drain, to debuff the Spheres with Major Breach so they die faster.
- The first person to go up will get the beam to deactivate the shield of the sphere.
- You need to walk the Beam through the Sphere so it deactivates the shield. Be careful, it also deals damage to your friends.
- All 4 DDs focus on the same sphere and then move on and kill all of them.
- Once they are all killed, go back to your original positon (North, South, East, West) and one person calls out “PRESS NOW” and everyone presses the button.
- Then you can leave through the portal that brought you up to get back down.
Refabricated Spider-room in Halls of Fabrication
After the second Boss is killed, you have to use the teleporter into the next area. Now, if you wan to play it save go with the full group to the right side and kill all the Spiders. Once you reach the boss you turn around and go to the other way till you end up on the boss again. Or, you can send one of your tanks to the right side so he can pull all the spiders with him and you meet up on the left side, one person will not aggro the Boss. You can run past him and he will just wait there if you are fast enough and all the Spiders will still follow you. The rest of the group goes to the left side and pulls all the Spiders to a position where you can savely kill them with the others from the off-tank. After those Spiders are dead the next bossfight is already waiting.
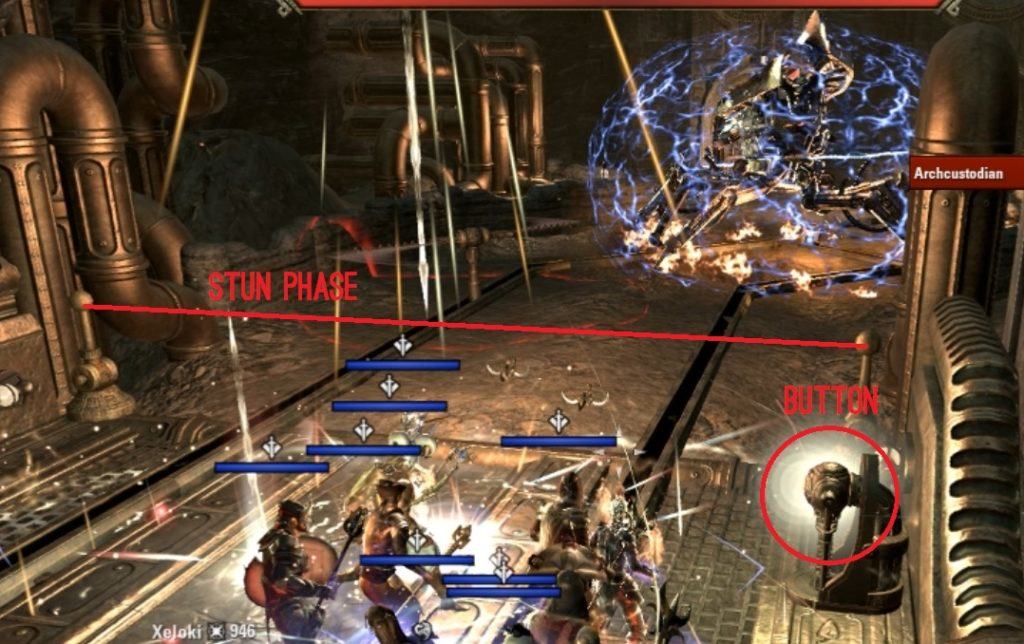
Third Bossfight
Archcustodian [HP: 20,7 Mio.]
This bossfight is a bit special. You can only damage the boss during the “stunphase”. As long as the boss has his shield up you will not be able to damage him at all. You need to press the button on the right side to activate a “shockline” so he walks through it and the boss will get stunned for approx. 15 seconds. During that stunphase you need to dish out as much damage as possible. Make sure to always stand behind the line, if you are too far ahead the shockline will drain your magicka. One boss is back up two adds will spawn, which you need to bring to your next stunpostion so you can kill them there quickly. Here it is very important, that you place your DoTs already on the boss before he gets stunned, to get maximized damage.
Boss Mechanics
- Shield
- As long as the boss is not stunned, you can not damage him.
- If you walk into the shield you will die.
- If adds get too close to the bosses shield, they will get a shield on themselfs and will be harder to kill.
- Stunphases
- Everytime you press that button to activate the stunphase, the boss will move faster to the next platform.
- Make sure to activate the Button early enough, you do not want to miss the stunphase.
- Place all your DoTs and ground based DoTs on the boss already, so you can go full out on damage when the boss gets stunned.
- Everytime you move to a new stunarea, make sure to bring the spawning adds along so you can kill them there.
- Make sure not to forget to debuff the boss for each stunphase.
- Adds
- Everytime after the boss recovered from the stun, two adds will spawn. Its either a Two hander or a Dualwield add.
- Make sure not to get damaged by the adds, avoid unnecessary damage.
- We place the adds slightly behind the Button, if the adds are far away when the boss gets stunned, they will NOT get a shield, then you can drag them into the boss and melt the rest of their health down with all the AoEs and Ultimates that you drop on the boss.
- Make sure to damage them as much as possible before the boss arrives at the stunphase.

- Blades
- Blades deal quite some damage and put a bleed on you, so you have to make sure that there are always heals or people use shields.
- We always stack on the fast spinning blades. Because it takes less time for the blades to get through so you will take less damage for that short amount of time.
- Shockattack
- If you are too far away from the boss, the boss will shoot shockdarts at you and you will most likely die pretty fast.
Once you figure out how to coordinate the adds with the boss and nuke them down, you should have no problems killing the boss. Just remember, everytime you press the Button, the boss will move faster to the next stunphase.
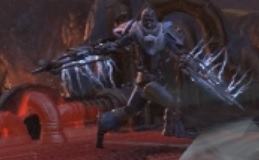
Junkyard in Halls of Fabrication
You will have to go through a hallway with blades and some adds. Now there is a new type of add called Capacitor, we like to call him “Megaman” , he has an AoE attack that will be placed on a person and then it slowly grows and exploded. If you do not block it you will get stunned and it starts draining magicka. So make sure to learn the animation of that attack.
After that hallway you will find yourself in the junkyard. You have to kill the big blue Centurion. Once he is close to his death he will revive the spheres around him. Make sure to send a DD to each of the spheres to interrupt them with their shock charge attack. After those are dead, repeat the same thing with the next Centurion and a few of the adds. Once those are dead the big door to the fourth boss will open up.
Fourth Boss
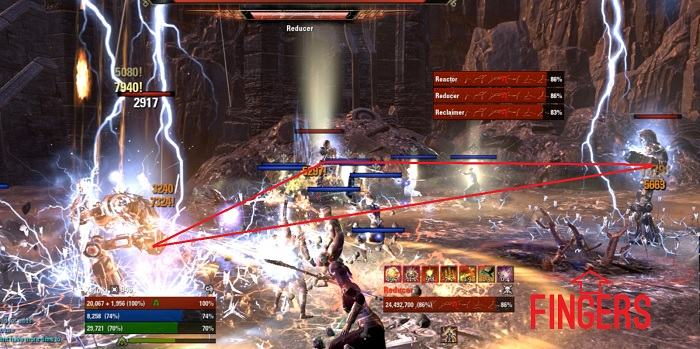
Reassembly Commitee [HP: 3x 28,5 Mio.]
This is the most difficult bossfight in the whole trial. It requires a high amount of coordination from tanks and then group. I highly recommend watching the bossfight video and the video guide, so you can really understand the fight. The tanks will be busy with the two Two Hander bosses. we split into two groups so we can both dps the Reducer and the Reactor.
Boss Mechanics
- Stun phases

- At 69%, 39% and 19% you have to bring all bosses to the reclaimer in the middle to stun them.
- When the bosses hits those percentage numbers, they will get overcharged. When they are overcharged they are in an “enraged” mode and almost oneshot everything.
- Make sure to drop all bosses to about 3% away from those numbers (so for example 72%), then bring them together and drop them to 69% so they all get stunned. They only get stunned when they are close enough together.
- Once they were stunned, take them apart again and start from scratch and repeat this till the last stunphase at 19%.
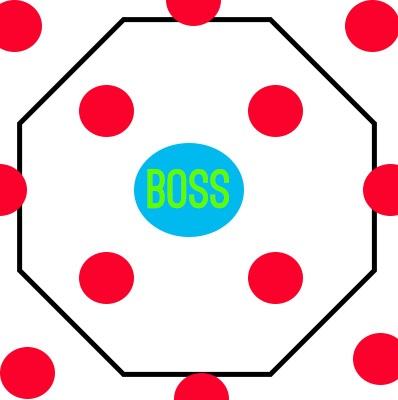
- Positioning Triangle
- I recommend tanking them in some sort of a triangle.
- Make sure that they can not get connected, if they get connected they will deal way more damage then usual and almost oneshot everything.
- It will show you a huge shockbeam between the boss, so you know they are connected.

- Reclaimer
- This is the boss in the middle, he never moves from his position.
- He will spawn a shield around him which will almost oneshot everything that touches it.
- Bombers
- After a while the Reclaimer will start spawning “Bombers”, they will spawn somewhere on the outside and slowly walk towards the Reclaimer. Once they reach him they will charge up and run towards a random target and blow them up.
- You can shield up so you will not die, as long as they are not empowered.
- We immediately focus the bombers once they are spawned, so you can kill them before they attack someone. Make sure to place all AoE around the reclaimer, so the bombers die pretty quickly.
- We save always 2 Destro Ultimates for this phase, so the bombers will definitely die.
- Also make sure to place Elemental Drain on the bombers. They will get more damage and your magicka setups will not run out of magicka that fast.
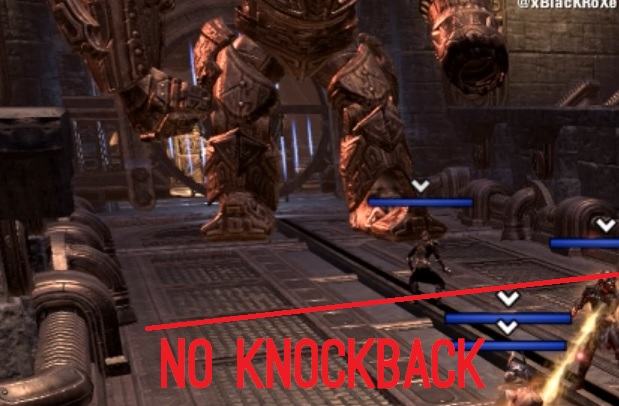
- If you block the explosion, you will only get knocked down, instead of being knocked back.
- After a while, the boss will also start placing the “Drain Shock” ground based DoT on your players which will slowly explode and stun people that get hit by it. You can block it, if you do not block it and you get stunned, it will drain your magicka.
- Reducer
- The Reducer has a powerful fire AoE attack, which shoots 3 fireballs away from him. Make sure your healers have purge ready to cleanse the Fire DoT as fast as possible.
- The Heavy attack from this boss is very strong, so the tank has to make sure to either dodgeroll or block it.
- Reactor
- The Reactor slams his sword into the ground and unleashes some sort of AoE towards someone and at some point it will stop and turn into “fingers”. If people stand in those they will get sucked down and take a lot of damage, so make sure to avoid those.
- The Heavy attack from this boss is very strong, so the tank has to make sure to either dodgeroll or block it.
- Reducer & Reactor Crosstaunt
- The tanks have to swap the bosses from time to time.
- After a while, bubbles will come out of the Reactor and Reducer, this means that the tanks have to swap the bosses with each other. If you take all 10 bubbles from the same boss, you will die, no matter what.
- As soon as the bubbles start you can cross taunt the bosses and go on with your usual business. Try to keep the bosses as steady as possible so they do not move a lot. If they move too much you will loose damage and they might get connected which results in a lot of unecessary damage.
- Burnphase
- Once one of the bosses drops below 25%, the burnphase begins.
- We always drop all bosses to 27% first and then start dropping them all to 22% and then bring them together.
- Static Bombers will start spawning on the outside and explode. After a while they will spawn closer and close to the middle. At some point there is basically no room to move around.
- Make sure to find a “sweetspot” where no bombers explode during the execute phase, there are some very small spots where they do not overlap and you should be save.
- Last Stunphase at 19%
- Now here is where it gets very tricky. Bombers are spawning from the outside, so you do not have a lot of time.
- Bring all the bosses together when they are around 22% so they get stunned at 19%. We usually do that right after the Reclaimer Bomber phase ended.
- Once they are stunned, make sure to only single target the Reclaimer. The Reclaimer is the first boss that needs to die. If he manages to keep spawning Bombers, they will most likely blow you up. So make sure to save some Destro Ultimates for those!
- The two Tanks have to bring the other two bosses away from the middle to a savespot, like in the video. Very important here is that they can not drop below 15%. Once they drop below 15% they will connect the shockbeam to each other and overcharge and most likely oneshot your tanks.
- After the Reclaimer is dead, you can bring in one of the two bosses and kill them one by one.
If you manage to kill this boss, you will have a happy time on the next one, believe me.
Addwaves after fourth Boss
After the fourth boss is dead, you will have to fight with some more adds in some long hallways. They are not really a big danger, just make sure to focus the Megaman add first. You will also find some electrified water, which will drain your magicka if you stand in it, so make sure to avoid it.
Last Boss
Assemby General [HP: 86,1 Mio.]
The last boss is easier then the fourth one. Once you figured out the positioning you will not receive a lot of incoming damage. The boss himself is not really the biggest threat here, the adds are more dangerous.
Boss Mechanics
- Stomp

- Every now and then he raises his left foot and stomps it on the ground, everyone in melee range has to block, otherwise you will get knocked back.
- The Stomp also deals some damage if you do not block it. Not a lot, but if you combine it with other incoming damage it can kill you.
- Fingers
- The right foot spawns fingers, so make sure not to get stuck in them, like on fourth boss.
- Meteors
- The boss will keep spawning Meteors on players which deal an fair amount of damage, that is why it is important not to overlap too much.
- Poison
- You can see Poison behind the boss, you can not stand there otherwise you will almost instantly die.
- Shocknodes Upstairs
- You can find Shocknodes upstairs, they deal quite a lot of damage so make sure to avoid those if you are upstairs.
- Left Fire Arm
- A magicka setup has to stand on the right side of the room. If noone stands up there the fire will hit the group. If someone is up there the fire will only hit this person.
- You can stand on the edge of the corner and not receive any fire damage at all, otherwise make sure to keep your shield up.
- Right Blade Arm
- We place our off Tank on that side so he can take care of the blade. If noone stands up on the left side the blade will hit the group and almost immediately kill everyone in seconds.
- Recharge Phases
- At 85%, 65% and 45% the boss will move to the middle after he lost both of his arms due to damage. He will repair his arms there.
- Once he lost both of his arms, make sure everyone moves away from the top, because sparkle shock damage will go there and might kill people close to the boss.
- During that phase, on each side a sphere will spawn.
- Do not damage the boss during the recharge phase, he gets a huge shield and if you damage him he will shoot shockflares at you which deal an insane amount of damage.
- Spheres during recharge phase
- During the recharge phase you have to kill at least two spheres, otherwise the boss will oneshot you. The more spheres you kill, the less damage you take from that boss burst damage.
- Now here is also very important, you need to stand in the middle of the lines of the room. If you move too far to the side the poison that spawns during this phase will almost instantly kill you.
- Two Handers & Megamans
- At 90% & 87% / 70% & 67% / 50% & 47% adds will spawn.
- For example, at 90% you get a Megaman and a Two Hander add. And at 87% you get another Megaman and a Two Hander add.
- You can either nuke them down together with the boss, or kill them seperately.
- Keep in mind, if you take too long to kill those adds from for example 87%, a timer will start and spawn more of them if you take too long. Timer does only begin at x7%.
- Like in the video displayed our tanks positions the adds next to where the sphere will spawn so we can drop all our ultimates on them and they die fast. Takes a bit of time to learn how to get the adds to stack there. Our Maintank usually taunts the Two Handers, while the Offtank tries to position the Megamans.
- Megamans have their Draining Shock again, so make sure to block that otherwise it will drain your magicka and you get stunned.
- Fascimilities
- If people die, it can be that Fascimilities spawn. Those are copies of your characters setup.
- The most dangerous one is the Magicka Sorc Fascimilitie, their mines almost oneshot players so be very careful. The Maintank should taunt the Fascimilities so they will die in AoE.
- Execute Phase at 25%
- at 30% and 27% you will again get the addspawns.
- The boss will go into the middle and start spawning meteors on the players. So you have to make sure to have a good placement for the execute phase in the middle of the room. If people overlap meteors you will die.
- With this positioning that you see on the picture, you should not overlap meteors. The healers have to make sure that they hit the players in the corners with healing springs.
Last Boss Hardmode
Assembly General Hardmode [HP: 107,8 Mio.]
There is not a lot of difference in the Hardmode of the Assembly General. All you will get is:
- everything does more damage.
- more Fascimilities will spawn.
- Boss has more Health.
There are no new extra mechanics.