

Welcome to the ESO Sanctum Ophidia Trial Guide. Sanctum Ophidia is a beautiful ancient Nedic Temple. The trial is located in the Craglorn zone. Sanctum Ophidia is also often referred to as SO.
Table of Contents
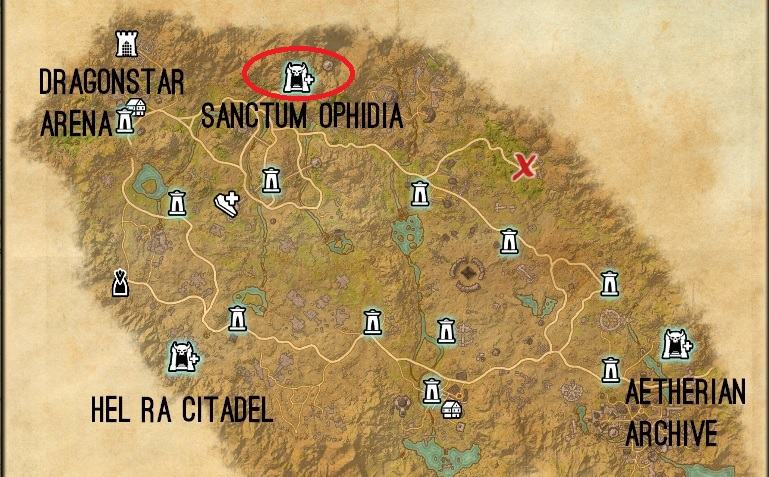
Location of Sanctum Ophidia
Sanctum Ophidia can be found in Craglorn.
Defensive Champion Points
Make sure to check out my article which talks about how to optimize damage mitigation in Trials through red Champion Points. Red Champion Points can mitigate damage by a huge margin, so really make sure to have the correctly set up!
In this trial you will have to deal with a lot of poison damage and also very friendly Overchargers will guide you the way through Sanctum Ophidia. There will be quite a handful of add groups to deal with. So as a raidleader you should announce the following for this trial to your group: 1: Always kill the Overchargers first in add groups. 2: If you have a poison circle underneath you, then you can infect other people with it.
First Adds in Sanctum Ophidia
Make sure your group is ready, buff food and skills checked and enter Sanctum. As soon as you entered, the timer for your leaderboard score will start. There is a very small and weak add group right at the beginning but don’t you lull yourself in a false sense of security! Follow the stone pad around the cliff and jump into the boss room and you will have to deal with the real first add group.
You can eliminate the first mini mini boss in the middle on the platform. Then you have to activate the two fire bowls besides him. Once they are activated huge groups of adds will spawn and run into the room from three different entrances. Your group should stay in the middle, all together, but not standing on each other’s feet because of splash damage. DKs and the tanks can pull the adds towards your group. Use AoE skills to burn those add waves down. Focus the Archers and the Scaled Court Conjure Adds first. The moment all Court Conjurers are dead, a new addwave will spawn.
Before you eliminated the last add wave, the first boss, Possessed Mantikora will spawn. Make sure you have enough space between your group and him to not accidentally pull. Also beware of pets from your Sorc DDs, if they are too close to Mantikora, the pets will automatically start the fight with him.
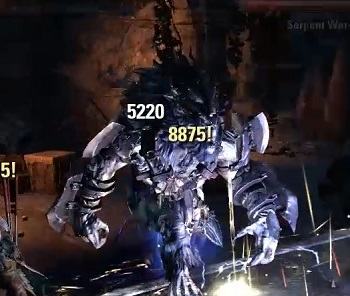
First Boss – Possessed Mantikora [HP: 39 Mio.]
The Mantikora is a beast and has some very painful mechanics and is not easy for new groups. But do not give up, with the following tips and tricks you should manage to kill him!
The Tank and Off-Tank have to be able to switch roles at any times, I will explain under boss mechanics why. For the Tank it is very important to tank the Mantikora with the face away from the rest of the group. The best position to tank this huge beast is in the middle of the room, facing Mantikora towards where he spawned. So your group can have all the rest of the space to move around if necessary.
The rest of the group stacks behind the Mantikora. One Healer & two Damage Dealers should stand slightly further away from the group, more about that in the Poison Shards Boss mechanics explanation..
Boss Mechanics
- Popcorn Circles
- Three red circles (one after another) will be put on random players by Mantikora. Before he throws this popcorn, he will speak out something and will throw his staff at the sky. The players that will get the popcorn will see it because their char will shine very light green before it and a red circle will slowly appear underneath the player.
- The circle will stun you shortly and then you will be thrown in the air by it, that’s why we call it popcorn.
- You have to dodge roll out of the first circle asap. It is important that you dodge roll towards the back of the room and away from the other players. You can then walk towards the back of the room and out of the two other circles that spawn after the first one and always in your direction.
- Advanced Tip: If you know the animation of the boss before he starts with the popcorn, you can already begin walking backwards before the red circles appear, that way you do not need to dodgeroll the first popcorn. Before the 3rd popcorn explodes, you can dodgeroll forwards to get faster back to the boss. If you dodge roll through it you will not get hit.
- Culminating Slam
- After the second round of the popcorn circles, the Mantikora will do a huge AoE damage. If possible block it.
- Your healers have to heal everyone to 100% after this, because players will get bleeding damage that only goes off when your live hits 100%.
- Your Tank can announce this AoE, because he is nearest to Mantikora and can see his animations.
- Black Holes
- The black hole that spawn randomly on any player in the group will port you to a sideboss. You have 100 seconds to kill this sideboss. If you are not able to kill it, Mantikora will go in enrage and your group will wipe.
- Usually you should have a Tank / Off Tank in the hole together with 3 DDs / 2 DDs and a healer. If your offtank can outheal it himself down there then bring 3 DDs, faster kill.
- As soon as the black hole spawns, the player that fell in it has to announce his role (DD, Heal, Tank). Three matching other players have then go in it, so that the four members can deal with the sideboss.
- Beware of the frontal cleave of the sideboss, it is a onehit for all non-Tanks.
- If the main tank gets the black hole underneath him, it is important, that the Off Tank is ready to tank Mantikora till the maintank is back. The group has to stand behind Mantikora all the time, because of his front cleave.
- Advanced Tip: When you DPS is over the top, you can skip the black hole and just nuke Mantikora away, before their will even spawn the first black hole!
- Poison Shard Circles
- Mantikora will drop huge red circles with a green shard in it that deal a big amount of poison damage. You have to stay out of them!
- This poison circles will drop at the players, standing the furthest away from Mantikora. That is why at least 3 players have to stand away from the group, because otherwise those circles will spawn too close to Mantikora and your group can’t deal any more melee damage or your tank has to move with Mantikora to another place. I do recommend having 2 ranged DDs and 1 Healer as “Decoys” that stand outside of the group for the poison spears.
- You have to block when the circle lands, because otherwise it will stun and slow you and you will most likely die. You have to move out of it as soon as the shard landed, just walk out of it asap.
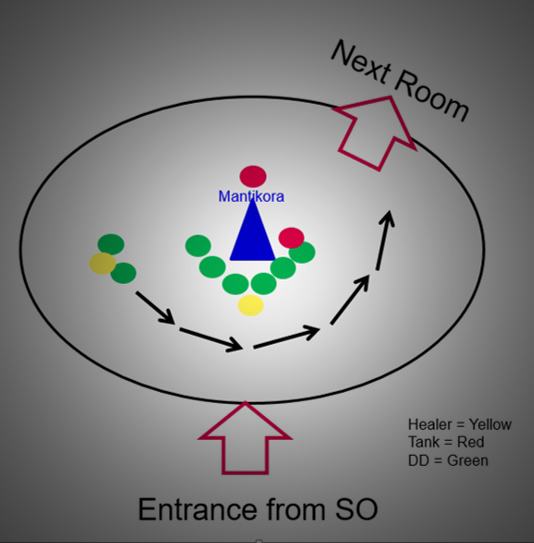
- The ranged DDs & Healer have to place the poison circles as far away as possible from the group. The circles will be put by them in a half circle at the back of the boss room. So they start at the left hand side and then begin moving towards right like in the picture, always behind the rest of the group. Just make sure you are still able to hit the boss.
The 3 people that are decoys for the spear can stack in the group at the beginning. Spears will only drop after the blackhole spawned.
Bridge Adds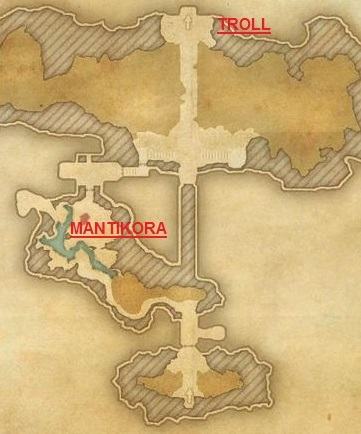
Once you managed to kill Mantikora, you can leave the boss room and take a walk towards a large hall with a bridge in the middle. The first add group is waiting for you before the bridge.
All the following trash groups will have Overchargers, Rockheaver Trolls, Warpriests and smaller Mobs in it. The main tank has to taunt the Trolls and the Warpriest whereas the Off Tank has to deal with the Archers and Overchargers. It is very important to kill Overchargers first, because they will lay a huge lightning’s circle on two random players that deal a ton of damage. Make sure to have a shield like Harness Magicka ready to activate. The players with the lightning have to slightly move out of the group because of splash damage.
 The Overchargers will also do some lightning damage, small circles on the ground that will follow one player, make sure to stay out of them and move away from the group, otherwise you will bring the circles into the group (splash damage!).
The Trolls will throw a poison AoE on the Main Tank, so make sure to stay away from him, because if you are to close on him, the poison damage will infect you and all players near you. If you are infected with the poison damage, your char will have a green aura and you have a red circle underneath you. It is important to stay away from other players to not infect other player, because this poison damage does a hell lot of damage. Together with other incoming damage from Overchargers or mobs, this can cause you a group wipe.
On the bridge there will also spawn two Overchargers. They will spawn on the right and left side, the right side will spawn first. If possible, kill him asap, before he can strike his lightning circles on two players. If you are finished with the first one, proceed to the next Overcharger. Beware of the holes in the bridge!
Your main tank has to taunt the incoming Trolls and stays away with them from the rest of the group. As soon as your group has killed the Overchargers, your main tank can bring the trolls back to them.
Second Boss – Stonebreaker Troll [HP: 28 Mio.]
This boss is, compared what you just had to deal with, pretty easy. Usually there will spawn Overchargers during the fight, which make the whole thing a little bit complicated, but there is a technique to avoid this.
The Main Tank has to run across the bridge, the rest of the group has to stay at the beginning from the bridge, where you came down from the first boss room. The tank then pulls the Troll backwards towards the last quarter of the bridge, where the fight will happen. The position is key, if the Tank pulls the Troll way too much towards the beginning of the bridge, he will reset. If he pulls him not enough towards it, the Overcharger Adds will join the fight. When you found the right position, there are only simple mechanics you have to deal with.
Boss mechanics:
- Three Way Avalanche
- The Troll has a frontal Avalanche damage skill that flows away from him in three straight lines.
- The main tank has to focus on facing the Troll towards him, to avoid that this attack directs its damage into the group.
- If you see his Avalanche attack, just take a step aside, to avoid getting hit by it or block.
- Stomp
- From time to time, the Troll will stomp. This deals a lot damage in a round AoE around him. Avoid standing in it when he is doing his stomp.
- Especially important for melee damage dealers. I recommend using a shield to protect yourself.
- Stone-Throw
- As soon as the Trolls holds up his arms, he will throw stones at random players in your group.
- The main tank can easily see this animation and warn the group to shield up and / or block. If you block when it hits you or are shielded up, you should survive. If it hits you unexpected you are most likely going to die.
When you killed this big guy, you can deal with all the Overchargers that spawned during the fight and are now waiting for you at the end of the bridge. When they kill the player, they will magically disappear in Nirvana. 1 Death for killing 5 Overchargers is acceptable.
Way to Ozara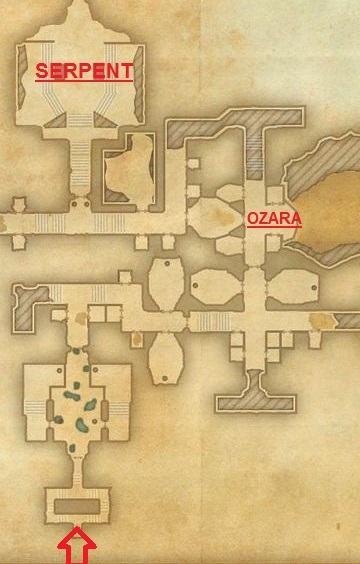
During the following hallways and rooms you have to avoid hugging and touching the huge snake pillars, because they will also spread the poison fields you are already used to from the Trolls.
Activate the two levers at the door at the same time to leave the bridge hall behind you. You will have to speed up the stairs and then you are in a room with two doors and two levers on the right and left side. You can either split up your group into two small teams (1 Tank, 1 Healer, 4 DDs), each team enters a room and deals with the following trash groups. Or you can send your Main Tank on the right side, where he tanks all Adds until the group on the left side killed their mobs and can switch to the right side. Just keep in mind, always tank Trolls away from the group and kill Overchargers first.
Once you cleaned the mobs behind the doors, you can switch the levers at the top on each room and proceed with the next trash group (consisting of two Trolls), that is awaiting you after the door at the middle.
There is a wooden walkway in the next room, beware of anyone falling down from it. There are four Trolls at the end of the walkway and there is another add group at the top of the stairs. Make sure you don’t move to fast and deal with each mob group one by one. Of course you can also pull them altogether and nuke them down.
At the next small room there is another group of mobs with Overchargers, Trolls and small mobs. Watch out for the poison strikes from the snake pillars here! When this group is down, you can handle either the right door or the left door first when you switch the lever. Just make sure everyone is ready and everyone enters the same room. You have to repeat this process twice more during the following rooms.
When you run upwards the stairs you will have to deal with another trash group consisting of Trolls, Overchargers and all the other ones you already met. Your healers have a tough job when there are also players with poison fields and lightning fields (huge splash damage). It is important that you use the explained techniques and stack and move together as a group.
When you killed all this, you are ready for the next beautiful lady, Ozara the Lamia.
Third Boss – Ozara Lamia [HP: 31 Mio.]
This boss has some friends that will join the fight and make it a hard knockdown battle. During the fight a Troll, a Overcharger, a War Priest, a Archer and two Skirmishers will spawn regularly. If you kill them during the fight, they will respawn after about 15 seconds. Because of this you have to use one of the following techniques.
Option 1
The Main Tank has to tank Ozara and the Overcharger that will spawn at the door on the right side of the room. He will tank them both at the door, where the Overchargers spawns every 15 seconds because he will get nuked in the AoE damage from your group.
The Off Tank has to tank the War Priest, the Troll and the Archer. He will stand at the entrance to the room, with enough space to the rest of the group. He has to make sure that the Archer arrow spray is facing him and not the group. Also the Trolls AoE Posion slams should not bother the rest of the group. This adds will not respawn, because you do not focus damage on them.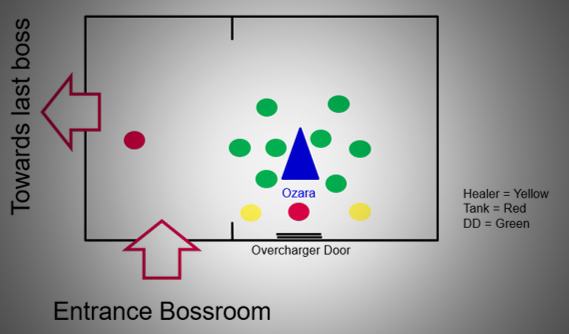
Option 2
The main Tank only has to deal with Ozara and he has to Tank her at the door where the Overcharger spawns.
One DD / Off Heal has to take care of the Overcharger. He has to slot Inner Fire from Undaunted Skill Line. And it does not hurt if he has some heal abilities slotted or shields. He will stand by the Off Tank near the entrance to the boss room. As soon as the fight starts he has to taunt the Overcharger. There will spawn a Totem at the entrance from the Shaman Add, he also has to make sure to kill this Totem. If you don’t kill this Totem, you will not be able to pull the adds out of the room, so make sure this Totem is killed asap. When he has the Overcharger in his back and has successfully killed the Totem, he just has to run back through the whole dungeon, always with the Overcharger with him. Make sure to use Inner Fire every 15 seconds, otherwise the Overcharger may go back to the group.
The Off Tank will also run away with his taunted friends. He has to taunt the Archer, the War Priest and the Troll and as soon as the fight started run away with them through the dungeon. Just make sure to taunt them from time to time that they do not lose interest and go back to the main group. Here you can see a picture of Option 1.
Boss mechanics:
- Formation
- Neither if you choose Option 1 or Option 2, the group formation is key. The main tank with Ozara will always stay at the Overcharger door. The two healers will stand on each side of the door and the rest of the group has to position themselves in two half-circles around the door. Melee DDs in the first row, Ranged DDs in the second row.
- You have to stick to this positions during the whole fight. Make sure the Healing Springs from your healer can reach every DD.
- If you stand too close together, the pins from Ozara will overlap and in Option 1 you will get splash damage from the lightning circles from the Overchargers. So make sure there is enough space between the players.
- Pin Bolts
- As soon as the fight starts, after 5 to 10 seconds, Ozara will start to pin two random players around her with a lightning AoE.
- The player on the right or on the left side from you is in charge to unpin you, every time you get pinned!
- Use your Synergy button to unpin people asap!
- The longer this fight goes on, the more players will get pinned from Ozara, every time she is using this skills. So make sure you kill that Lamia fast.
Way to the final Boss
After you finished Ozara, the door to the next room will open and Trolls will enter the room. Your Main Tank has to pull the Trolls asap and move them away from the group.
In the next room you will have to deal with the last big Trash group. Beware of the poison fields and kill Overchargers first! Once you dealt with this group, you are ready for the last boss in Sanctum Ophidia. No more Overchargers, huray!
Final Boss – The Serpent [HP: 52 Mio.]
Compared to Ozara or Mantikora, the final boss in SO is easy. This Hardmode is also one of the easiest ones, so if your group is looking to begin clearing Hardmode, this one is a good to start with!
As group leader you have to make sure, every member has a ability slotted, that costs a ton of magicka (why I will explain under boss mechanics). The siege shield or purge from Alliance war are such high cost magicka skills.
Make sure your healers have Nova skill slotted. Also one Templar DD should have it slotted, if the rotation with two healers is not enough. You will only have to heal the main and off Tank and during poison phase the whole group. So if possible you can DPS during the non-poison phase or one heal can completely switch to an Off-Heal-DD.
The Main Tank has to tank the Serpent on the platform in the middle of the room, facing the Serpent towards north, away from the group so that his cleave attacks only hits the Tank. Everyone besides the Off Tank stacks together on the platform behind the Serpent.
The Off Tank has to pull all Adds (Mantikoras and Lamias) on the left side (view from entrance) of the room and keep them busy and away from the rest of the group.
Boss mechanics:
- Poison Phase
- When the boss goes down under the ground and appears in the middle of the platform center, poison phase is incoming. He will deal very high damage with his poison, that is spread out to the whole room.
- One of the healers has to use his Nova and put it on the boss in the middle. The rest of the group has to stack closely on the platform (except offtank if you decide to let him tank the lamias and mantikora outside), so that healers can heal through this phase with healing springs.
- As soon as when this phase is over, the Serpent will do a frontal cleave attack, so stay away and wait until the Main Tank has taunted him and faces him away from the group.
- Totems and Lamias
- When the first poison phase is over, also the first Lamia will spawn at the left side of the room. Also two Totems, a green and a blue one, will spawn.
- The Off Tank has to taunt the Lamia and pull her out of the group AoE and away from the group to the left side of the room. The less damage the Lamia takes, the better! Don’t focus your DPS on her! If the Lamia dies, she will explode and deal a ton of damage in a huge AoE.
- The green Totem can pull one player across the room. If you got pulled, you have to make two dodge rolls to break free and to be able to walk back to your group.
- The blue Totem will put Magicka bombs on players
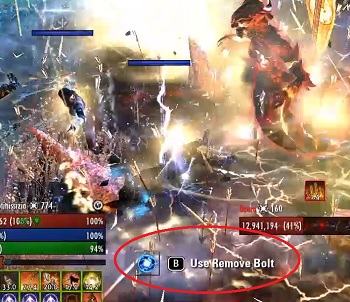
- Magicka Bombs
- When one player has the Magicka Bomb, his character will shimmer blue.
- He then has to lose all his magicka in the next 15 seconds. You really have to be under 10% or even totally out of magicka. This depends on the level of magicka you had, once the Magicka Bomb hit you.
- When you can’t lose your magicka fast enough, you will die at the end of the explosion.
- If you manage to lose enough magicka, the blue light will go away and you will regain some extra magicka.
- There is also a Poison Totem that connects with the Serpents and allows him to do even more damage in his poison phase.
- You can either ignore to Totems completely (when you DPS is high enough) or you have to focus them, as soon when they spawn. First kill the Poison-Totem, then the Magicka Bomb (blue) Totem and then the Pull Totem (green).
- Magicka Bombs
- Mantikoras and Pink Orbs
- When the Mantikora spawns, either your main Tank can taunt him or the off Tank. When the main Tank taunts him, the Mantikora will die in the AoE damage around the boss. When your OFF Tank taunts him, make sure your DDs focus the Mantikora down.
- When the second Mantikora spawns, it is very important that you run out of the platform on the fields asap after the Poison phase and grab a pink Orb.
- The Orbs will spawn around the platform. Usually there are enough Orbs for all players. It is important that every player uses only one Orb!
- It may be easier when you decide who will run in which direction to grab his Orb at the beginning of the fight.
- The Orb behind the boss is always reserved for your Main Tank, so that in any cases he can survive. Make also sure your Healers and the Off Tank will get one!
- When you can’t grab an Orb, you will die after the shadow explosion from the Serpent. The good thing is, also all Adds and Totems will die because of the shadow explosion.
- Last Poison Phase
- When the HP from the boss is very low, at about 1-4% he will start doing a last poison phase which will deal very high damage.
- Make sure your healers have their ultimate ready and have enough Magicka to heal through this last phase.
- DDs just focus on killing the boss asap.
- Do not stop healing and doing DPS when he is at 0% because this phase will go on a little longer!
- After the poison is over you will also have to grab the last Orb and you have killed The Serpent!
You can divide this boss fight into these phases, maybe this will help your group: Poison Phase / Lamia and Totems / Poison Phase / First Mantikora / Poison Phase / Lamia and Totems / Poison Phase / Second Mantikora / Poison Phase / Orbs and everything again from the start.
Final Boss – The Serpent [HARDMODE] [HP: 59,2 Mio.]
Besides from the boss mechanics on normal mode in Sanctum Ophidia, there is only one new mechanic you must consider when killing the Serpent on Sanctum Ophidia Hardmode. For activating HM, you have to burn the banners at the middle of the stairs on the left and right side before the boss room. Once you activated Hardmode, this boss will stay Hardmode, it is not possible to “revert” the banners. Remember that when your guild mates want to fire things up!
Boss mechanics:
- Poison Field
- When the Serpent hits his arm in the air and a green light comes out, you know you have to run. He will draw a big green circle on a random player. If you stand in it, you are dead.
- Like on non-hardmode, the group usually stacks on the platform behind the boss. But when the Poison Field animation from him begins and the green light is starting coming out of his hand, everyone has to run away from the platform and spread out wide. With this tactic, the poison field usually should spawn in the middle, where everyone was stacked.
- If the poison field does not spawn in middle, but on a random player in the room, make sure you dodge roll out of it asap. Every other player that may be also targeted has to dodge roll out of it.
- The small poison fields he will put on players during the fight can be ignored, because they don’t deal that much damage.
Related Content: