


Type: Solo vet Maelstrom & vet Vateshran Hollows, Dungeons, Overland
Table of Contents:
- Maelstrom and Vateshran Hollows
- Setup 1 (with Mythic)
- Setup 2 (without Mythic)
- Champion Points
- Important Information (Food, Potions, Mundus, Race, Passives, Attributes)
- Full Walkthrough (Video Guide)
Easieast way to clear Maelstrom & Vateshran Hollows Arena with this One Bar Sorcerer Build for ESO.
This one-bar heavy attack build is specifically made for people who want to avoid swapping weapons all the time in ESO. With this setup, you will have good damage, a huge shield, a huge health pool, a huge magicka pool and a huge stamina pool as you can see in the character stats screenshot below.
- 1 Bar Pet Sorc Build
- Huge Shields
- Huge Health, Magicka and Stamina Pool
- Good Damage
- Good Healing
- Easy veteran Maelstrom Arena clear
- Easy veteran Vateshran Hollows Arena clear
Maelstrom & Vateshran Hollows Setup


The picture uses setup 1. 5x Plague Doctor, 5x Necropotence, 1x Ring of the Pale Order on a High Elf with Bewitched Sugar Skulls food.
- Unbuffed: Out of combat, pets and buff food are active.
- Buffed: In combat, buff food, pets and Spell Power Potion active.
I will present you two different setups for the 1 Bar Magicka Sorcerer Build. They are almost identical with the only exception being that the first setup uses a Mythic item, and the second setup uses a full Monster Set.
- Setup 1: 5x Plague Doctor, 5x Necropotence, 1x Swarm Mother, 1x Ring of the Pale Order
- Setup 2: 5x Plague Doctor, 5x Necropotence, 2x Iceheart
Setup 1 One Bar Sorcerer
Setup 1 uses a Mythic item called Ring of the Pale Order which will increase our healing output tremendously, therefore we can use Elemental Drain instead of Critical Surge on our bar. That way we increase our damage output by a lot too. Please keep in mind, that the Pale Order ring only heals when you deal damage! The ring is very helpful if you plan to play the 1 Bar Magicka Sorcerer build setup in the Vateshran Hollows Arena and Maelstrom Arena.
We are using the one-piece Swarm Mother Monster Set because it gives us an extra Magicka and Stamina bonus. Most one-piece Monster Sets only give one bonus, Swarm Mother is an exception, which is nice for us. More Magicka to deal damage and shield with and more Stamina to dodge roll and block!
Setup 1 Gear
Alternatively, you can also run the Oakensoul Ring instead of Ring of the Pale Order. However, keep in mind that the Pale Order ring gives you a lot of healing that you need to get from somewhere else if you are running the Oakensoul Ring. I recommend slotting Crit Surge then instead of Elemental Drain.
| Gear | Set | Weight | Trait | Enchantment |
|---|---|---|---|---|
| Chest | Plague Doctor | Heavy | Infused | Magicka |
| Belt | Necropotence | Light | Divine | Magicka |
| Shoes | Necropotence | Light | Divine | Magicka |
| Pants | Necropotence | Light | Infused | Magicka |
| Hands | Necropotence | Light | Divine | Magicka |
| Head | Swarm Mother | Medium | Infused | Magicka |
| Shoulder | Necropotence | Light | Divine | Magicka |
| Necklace | Plague Doctor | Jewelry | Healthy (or Arcane) | Spell Damage |
| Ring | Plague Doctor | Jewelry | Healthy (or Arcane) | Spell Damage |
| Ring | Ring of the Pale Order | Jewelry | Bloodthirsty (or Arcane) | Spell Damage |
| Weapon 1 | Plague Doctor | Shock | Infused | Shock Enchant |
Where can you get the gear?
Plague Doctor: Overland Deshaan, Guildstores
Necropotence: Overland Rivenspire, Guildstores
Ring of the Pale Order: Antiquities System
Swarm Mother: Spindleclutch 1
Setup 1 Skills


| 1 Bar Shock Staff Setup |
|---|
| Slot 1: Hardened Ward |
| Slot 2: Unstable Wall of Elements |
| Slot 3: Elemental Susceptibility |
| Slot 4: Volatile Familiar |
| Slot 5: Twilight Matriarch |
| Ultimate: Shock Rage |
Skill explanation:
- Hardened Ward: This is your shield, always keep it up. (Useful Guides: How do Shields Work?, How do Shields Scale?)
- Unstable Wall of Elements: One of your main damage abilities, keep it up all the time on the enemies plus it also explodes with nice damage.
- Elemental Susceptibility: Elemental Drain reduces enemies’ Spell Resistance and adds status effexts, thus increasing our damage tremendously. Alternatively, you can also use Critical Surge here for extra heals.
- Volatile Familiar: One of your main damage abilities, keep the skill up all the times you are engaging enemies. The last pulse also stuns enemies.
- Twilight Matriarch: When you drop low on health, use the shield first and then use this ability, which will give you a big burst heal.
- Shock Rage: Save this for big monsters or when you have trouble killing a certain mob or wave.
Setup 2 One Bar Sorcerer
Setup 2 uses a full Monster Set called Iceheart instead of a Mythic item like in Setup 1. To compensate for the loss of healing from Setup 1 we will have to slot Critical Surge on our bar to benefit from constant healing while we deal damage. Iceheart will provide you with constant shielding in case you forget to reapply your own shield.
Setup 2 Gear
Two-handed weapons count as two pieces for those that have not played in a while, that way we can get the 5x Necro, 5x Plague, 2x Iceheart setup.
| Gear | Set | Weight | Trait | Enchantment |
|---|---|---|---|---|
| Chest | Plague Doctor | Heavy | Infused | Magicka |
| Belt | Necropotence | Light | Divine | Magicka |
| Shoes | Necropotence | Light | Divine | Magicka |
| Pants | Necropotence | Light | Infused | Magicka |
| Hands | Necropotence | Light | Divine | Magicka |
| Head | Iceheart | Medium | Infused | Magicka |
| Shoulder | Iceheart | Light | Divine | Magicka |
| Necklace | Plague Doctor | Jewelry | Healthy | Spell Damage |
| Ring | Plague Doctor | Jewelry | Healthy | Spell Damage |
| Ring | Necropotence | Jewelry | Arcane | Spell Damage |
| Weapon 1 | Plague Doctor | Shock | Infused | Shock Enchant |
Where can you get the gear?
Plague Doctor: Overland Deshaan, Guildstores
Necropotence: Overland Rivenspire, Guildstores
Iceheart: Head, Direfrost Keep. Shoulder, Glirion Undaunted Chest
Setup 2 Skills

| 1 Bar Shock Staff Setup |
|---|
| Slot 1: Hardened Ward |
| Slot 2: Unstable Wall of Elements |
| Slot 3: Critical Surge |
| Slot 4: Volatile Familiar |
| Slot 5: Twilight Matriarch |
| Ultimate: Shock Rage |
Skill explanation:
- Hardened Ward: This is your shield, always keep it up.
- Unstable Wall of Elements: One of your main damage abilities, keep it up all the time on the enemies plus it also explodes with nice damage.
- Critical Surge: Applies Major Sorcery, 20% more Spell Damage and heals you every time we get a critical hit!
- Volatile Familiar: One of your main damage abilities, keep the skill up all the times you are engaging enemies. The last pulse also stuns enemies.
- Twilight Matriarch: When you drop low on health, use the shield first and then use this ability, which will give you a big burst heal.
- Shock Rage: Save this for big monsters or when you have trouble killing a certain mob or wave.
Champion Points for the One Bar Sorcerer
Below you can find the Champion Points setup for this build. Work your way from top to bottom in your allocation. For more information on Champion Points, please visit the Champion Points Overview Page on ESO-Hub.com.
Hovering over each perk will give you insights into what it does. Presets are also provided for each of the allocations below.
Click the tab below to open the allocation.
Important Information One Bar Build
In this section of the One Bar Magicka Sorcerer Build we are going to take a look at some of the most important information, such as buff food, race, mundus stone, potions, passives and attributes.
Buff Food for the 1 Bar Sorcerer
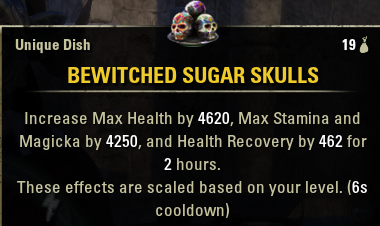
You have two options, Bewitched Sugar Skulls will give you the best stats, but the buff food also costs quite a lot. You can also use Longfin Pasty With Melon Sauce, which is only a tiny bit less powerful than the other one but only costs a fraction of the price.
Bewitched Sugar Skulls
(Max Health, Max Magicka, Max Stamina, Health Recovery)
Longfin Pasty with Melon Sauce
(Max Health, Max Magicka, Max Stamina)

Potions
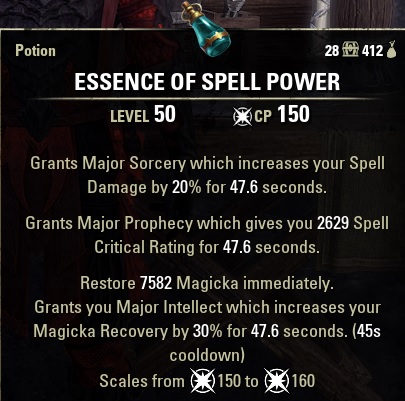
Optimally, you want to use the Spell-Power Potions, because they provide you with Major Sorcerery, Major Prophecy and Major Intellect, all boosting your stats like crazy. This is only important if you are doing more difficult content. If you are doing easy content you can simply use normal Essence of Magicka potions.
Make sure to have the Alchemy passive Medicinal Use, to fully benefit from the potions with a 100% uptime!
Spell-Power Potions
(Spell-crit, Spell Damage, Magicka)
(Cornflower, Ladys Smock, Water Hyacinth)
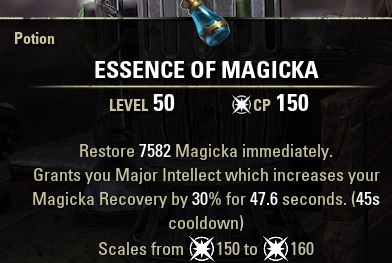
Essence of Magicka
You can run Essence of Magicka, they are not the best but better than nothing. They drop from Overland Monsters or you can buy them in the Guildstore for a cheap price.
Mundus Stone
The Mage Mundus Stone will increase our Max Magicka even further, thus increasing our damage and our shield. if you want to learn more you can check out the Mundus Stone Page.
The Mage Mundus Stone (Increased Maximum Magicka)
Race
All Magicka-based races work with this setup. More about each race can be found on the racial overview page.
High Elf
Breton
Dark Elf
Argonian
Khajiit
Orc
Passives
- Dark Magic: Unholy Knowledge, Blood Magic, Persistence, Exploitation
- Daedric Summoning: Rebate, Power Stone, Daedric Protection, Expert Summoner
- Storm Calling: Capacitor, Energized, Amplitude, Expert Mage
- Destruction Staff: Tri Focus, Penetrating Magic, Elemental Force, Ancient Knowledge, Destruction Expert
- Light Armor: Grace, Evocation, Spell Warding, Prodigy, Concentration
- Heavy Armor: Resolve, Constitution, Juggernaut, Revitalize, Rapid Mending
- Undaunted: Undaunted Command, Undaunted Mettle
- Racial: All
- Alchemy: Medicinal Use
Attributes
All into Magicka.
64 Magicka, 0 Health, 0 Stamina
Full Walkthrough with Video Guide
Maelstrom Arena
The video showcases a full run with an explanation of what is going on in the veteran Maelstrom Arena. I highly recommend watching this if you have problems clearing the arena. I also recommend reading the very detailed Maelstrom Arena Guide, which explains some nice tricks that you can use.
Vateshran Hollows
I highly recommend checking out the written guide to learn more about the Vateshran Hollows arena. The written guide explains everything in detail and also has some nice tricks explained, that you can use to make your life easier!
Here is a second run I did with the One Bar Pet Sorc Build.
Advanced Builds
If you want a more advanced build, you can check out the Mystic Magicka Sorcerer META Build or the Summoner Magicka Sorcerer Pet Build. You can also find a Solo Magicka Sorcerer Build for all sorts of activities.