


Welcome to the Sorcerer DPS Test article for ESO (Elder Scrolls Online). Today I am going to explain to you how I reached the 111k dps that I showcased in the Sorcerer build video for the Deadlands DLC.
Please keep in mind that the setup here is a full target dummy humper setup. Therefore this setup will differentiate from the original dungeon and trial Magicka Sorcerer Build. The reason is simple, you can optimize builds for a target dummy parse but that doesn’t necessarily mean they will also work perfectly in a dungeon and trial. For example on a target dummy you don’t have to move around, you don’t need to shield yourself, you can completely focus on damage.
Table of Contents:
The Target Dummy Sorcerer Build Setup
Lets take a look at the setup and I will explain why I use certain things on the Sorcerer DPS test setup. The setup uses the Thief Mundus Stone, the Ghastly Eye Bowl Drink buff food and the Spell Power Potions.
5x Perfected Bahsei’s Mania, 5x Kinra’s Wrath, 1x Harpooner’s Wading Kilt, 1x Slimecraw, 1x Perfected Crushing Wall. on a High Elf with Ghastly Eye Bowl drink
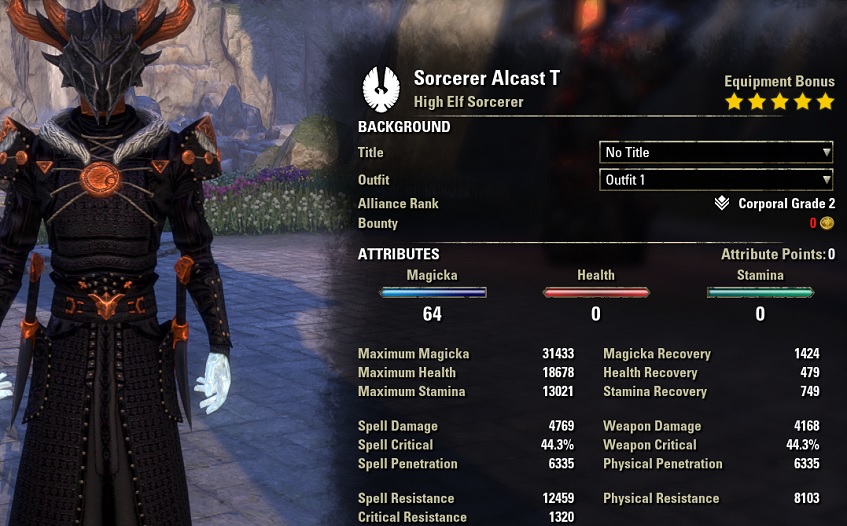
- Unbuffed: Buff food active.
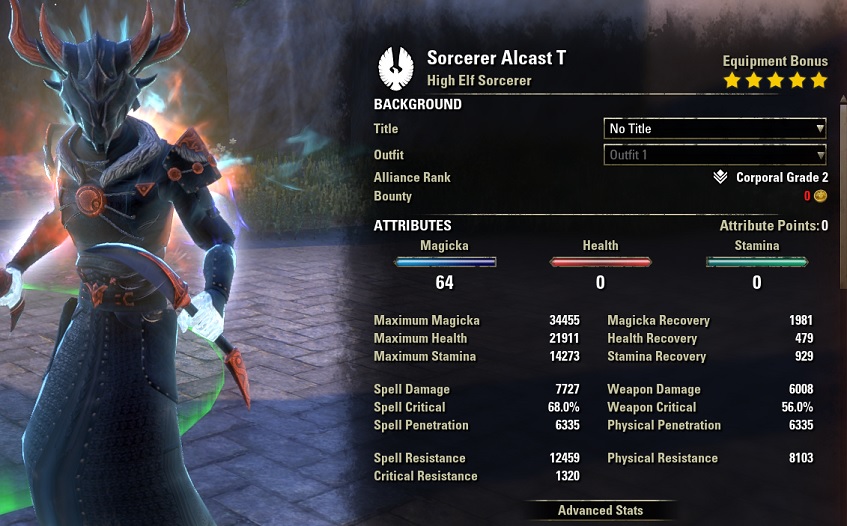
- Buffed: Buff food, raid target dummy buffs, pets, spell power potion, weapon damage enchantment, Harpooner’s Wading Kilt and Dawnbreaker active
The Sets used for this Sorcerer DPS Parse
| Gear | Set | Weight | Trait | Enchantment |
|---|---|---|---|---|
| Chest | Perfected Bahsei’s Mania | Light | Divine | Magicka |
| Belt | Perfected Bahsei’s Mania | Light | Divine | Magicka |
| Shoes | Perfected Bahsei’s Mania | Light | Divine | Magicka |
| Pants | Harpooner’s Wading Kilt | Medium | Divine | Magicka |
| Hands | Perfected Bahsei’s Mania | Light | Divine | Magicka |
| Head | Perfected Bahsei’s Mania | Light | Divine | Magicka |
| Shoulder | Slimecraw | Light | Divine | Magicka |
| Necklace | Kinra’s Wrath | Jewelry | Bloodthirsty | Spell Damage |
| Ring | Kinra’s Wrath | Jewelry | Bloodthirsty | Spell Damage |
| Ring | Kinra’s Wrath | Jewelry | Bloodthirsty | Spell Damage |
| Weapon 1 | Kinra’s Wrath | Dagger | Nirnhoned | Poison Damage Enchant |
| Weapon 1 | Kinra’s Wrath | Dagger | Charged | Fire Damage Enchant |
| Weapon 2 | Perfected Crushing Wall | Fire | Infused | Weapon Damage Enchant |
Why use Dual Wield over a Destruction Staff?
First off you might notice that we are using dual wield weapons instead of a destruction staff on the frontbar. Dual wield weapons will give you higher dps on a target dummy and raids. However, I only recommend dual wield to very experienced players because most players will lose damage with dual wield because it is hard to constantly stay on the target.
Dual wield is only recommended if you can stay on the target at all times. If you have to go ranged then a staff will be the better option. On the target dummy you will gain around 7k extra dps with dual wield compared to a destruction staff.
Let me showcase you some of the reasons why this is more viable nowadays. In the Markarth DLC which launched at the end of 2020 they changed how weapons scale. The patch notes mentioned: “All Light, Medium, and Heavy Attacks now dynamically scale with your highest offensive stats”.
![]()
That means if you are playing a magicka based characters you could theoretically use a two hander, bow or dual wield and still do good damage with it. And because of that dual wield already became a good option especially because dual wield has a good passive called Twin Blade and Blunt which will give you better stats, in our case we use daggers and therefore we will gain extra critical chance. In addition we also gain a bit of extra spell damage thanks to the Dual Wield Expert passive.
Not only that, in the most recent update called Deadlands the developers buffed the charged trait. In the patch notes they mentioned: “Charged: Increased the potency of this trait to 480%, up from 220%, to ensure it is more competitive with other traits in terms of effectiveness”. That means weapon damage enchantments will proc more often with the charged trait.

And when you look at the dps parse you can see that my enchantments alone did a total of 7817 damage, which is ridiculous.
Why Harpooner’s Wading Kilt and not a full Monster Set?
On the parse you can notice that I use the Harpooner’s Wading Kilt + 1x Slimecraw instead of a full monster set like in the original build. On the target dummy you will gain higher damage with the Harpooner’s Wading Kilt. To really gain max damage it is also recommended to activate the kilt before the fight. So you can already start with the maximum power of the mythic item.
Basically you can just attack another target dummy till the kilt activates and then wait until you are out of combat, the kilt will stay active for almost 1 minute so you have enough time to start the dps parse on the target dummy.
Keep in mind that the kilt is better on the target dummy but that doesn’t necessarily count for a dungeon or raid. The main reason being that ESO now has a critical damage hard cap of 125%, you can learn more about this in the Critical Damage Guide. If you are already over the cap a monster set might be the better choice. A monster set is also often easier to use than the kilt, because the kilt loses power every time you get hit by direct damage or when you die.
The Skills
Lets take a look at the skills setup for the Sorcerer DPS parse.
Before you start the parse activate Channeled Acceleration and then swap it out with Barbed Trap. That way you already have the Minor Force buff active when you engage.


Why is the Skill Setup different from the original build?
The skill setup is optimized for the target dummy. Therefore all that really matters is your single target damage and resource management. Resource management can be tricky because we use the Perfected Bahsei’s Mania set and want to keep our resources low. You should try to keep your magicka resource below 30% to really gain the most out of the Bahsei set.
If you run into sustain issues because you try to stay low on magicka because of the Bahsei set you could also run Spell Symmetry instead of the Degeneration skill. You would lose a bit of damage but you will have greater control over your resource management.
In addition, you can also see that we don’t run a normal spammable like Elemental Weapon or Force Pulse. In this case our spammable is the skill Crystal Fragments. Using Frags will actually increase your overall damage on the target dummy. However, in a dungeon or raid it can be painful to use because the ability has a cast time and that means sometimes you get stuck or you miss out on light attacks.
The Sorcerer DPS Parse
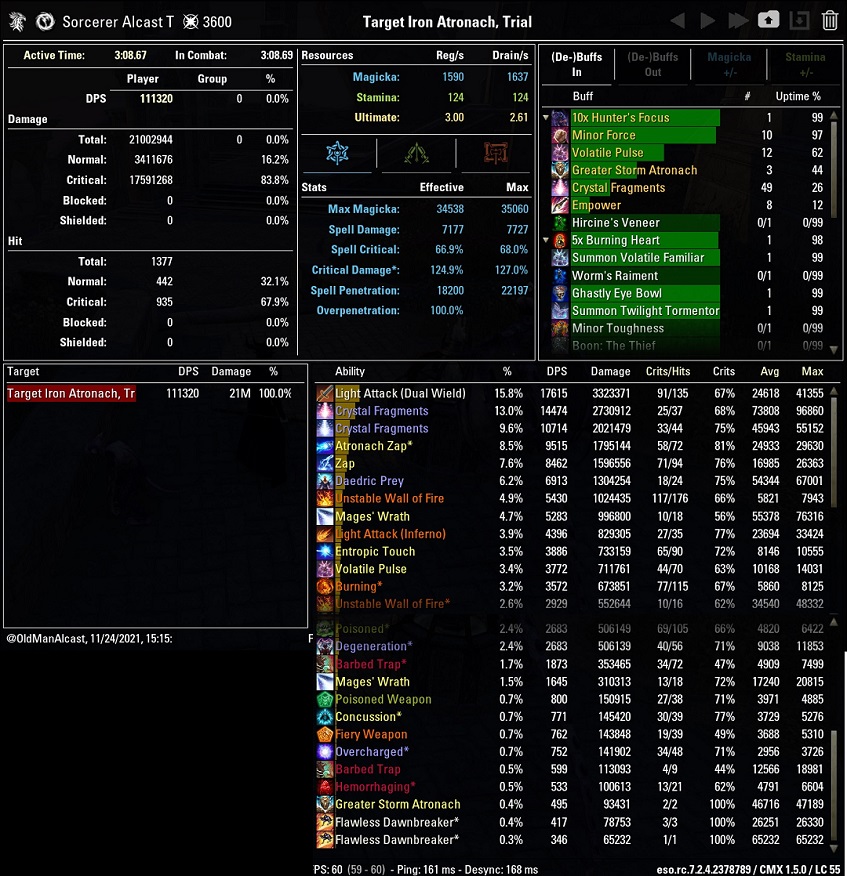
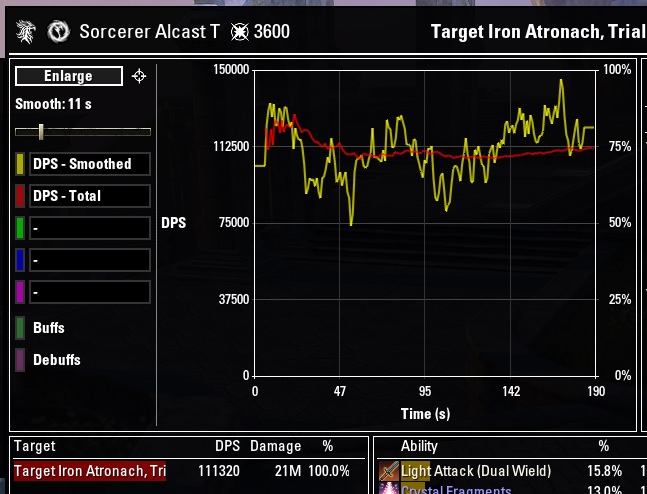
When we look at the parse itself you can see that here we did 111320 dps on the 21 million raid target dummy. The parse itself didn’t really have great critical hits, we could have definitely gained another 3-4k dps just by sheer luck. Just by farming more parses I am sure I could have gotten a parse where most skills had 70%+ crit hits and then I would have had more overall dps.
A few important notes:
Light Attacks of dual wield and staff did a total of 22k dps (17615 + 4396). You really can’t miss any light attacks between abilities otherwise you lose too much damage, you can learn more about how to weave correctly in the Weaving Beginner Guide.
Crystal Fragments alone gave me a total of 25,1k dps (14474 + 10714). That is one skill, kind of insane damage. The reason you see this listed twice is because you have to normal cast Crystal Fragments (10714 dps) and the instant proc Crystal Fragements (14474 dps).
All the pets combined (Greater Storm Atronach, Volatile Familiar and Twilight Matriach) did a total of 26,1k dps (9515 + 8462 + 3886 + 3772). Pets damage is this high because it gets also boosted by the skill Daedric Prey, which boosts pet damage by 20%.
The Flame and Poison damage enchantments did a total of 7,8k dps (3572 + 2683 + 800 + 762).
Quick note about the Unstable Wall of Fire skill, it did a total damage of 8,4k dps (5430 + 2929). But not only that, the main point of this skill is that it keeps our weapon damage enchantment a 100% active and it also keeps the Crushing Wall (Maelstrom Staff) active on the front bar, a lot of players are unaware of this. Why does it work like that? Because you applied the Unstable Wall of Fire on the backbar its effects kind of “stick” to it (meaning the weapon damage enchant and the set effect) even if you swap to the frontbar.
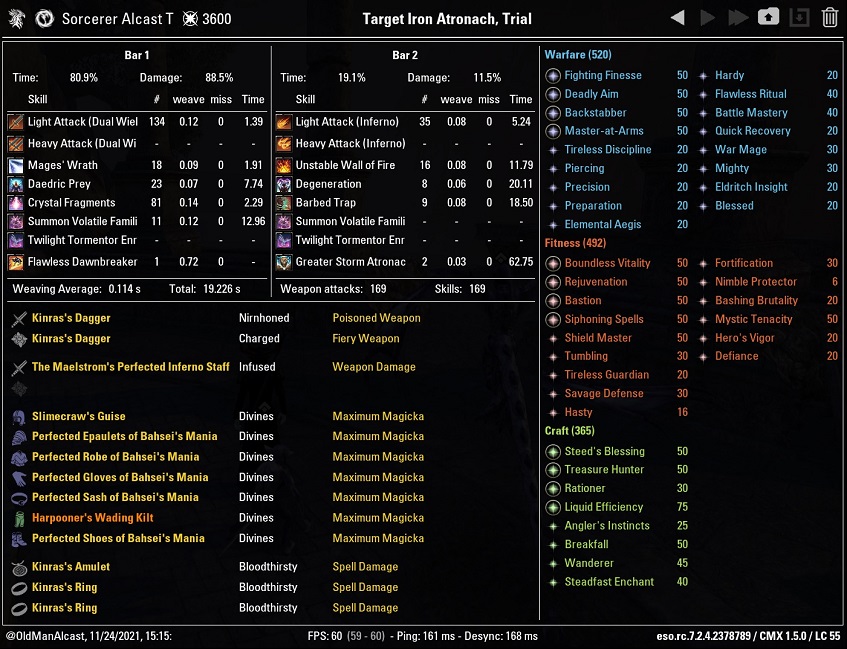
The screenshot below shows the setup I had active. You can see that I used Fighting Finesse, Deadly Aim, Backstabber and Master-at-Arms active perks from the champion point system. You can also find the Champion Points setup in the Champion Points Calculator Sheet.
On the target dummy it makes sense to run Fighting Finesse and Backstabber. In a raid maybe not so much. These two perks both give you extra critical damage. Here on the raid target dummy we manage to reach exactly the hard cap of 125%. However, in a raid you most likely have more buffs available thanks to support characters such as healers and tanks and therefore you might already be at the cap without one or both of the perks. Always consult your raid leader about this.
Below in the screenshot you can see the flow of dps throughout the Sorcerer dps parse. You will notice that the damage is the highest at the start of the fight. The main reason why Sorcerers have the most damage at the start is because of the Amplitude passive, which increases your damage by amount of boss health.
When you start a dummy parse you first want to drop your magicka low because of the Bahsei set. Then you want to activate most damage abilities before you start the fight, in our case we prebuff with the three pets Greater Storm Atronach, Volatile Familiar and Twilight Matriach. So you hit the target dummy with everything at once, which results in a huge spike of dps at the start.
Sorcerer Parse Rotation
If you want to maximize damage for the Sorcerer DPS parse then make sure to prebuff:
- You can first hit another target dummy until you have the 10 stacks of the Harpooner’s Wading Kilt active (deactivate your pets for this). That way you go into the fight with more crit chance and crit damage. Make sure to wait until you are out of combat before you start the parse. This isn’t a problem because the kilt lasts for a full minute until it runs out.
- Drink the potion before you start the fight and then start the fight when the potion timer is around 20 seconds. that way you can drink a potion already after 20 seconds fight time instead of waiting for a full 45 seconds.
- Drop your magicka low with either spamming Unstable Wall of Fire or Cleanse.
- Prebuff with Channeled Acceleration and then swap it out with Barbed Trap. That way you already have the Minor Force buff active when you start the fight and you won’t have to activate the trap for a while.
- Before you engage activate the Volatile Familiar, Twilight Matriach and the ultimate Greater Storm Atronach. That will give you a big boost at the start.
The rotation is dynamic, that means we reapply buffs once they ran out. The Twilight Tormentor is only summoned but we never activate its ability mid fight. Other than that you want to keep up the Unstable Wall of Fire, Volatile Familiar, Daedric Prey, Barbed Trap and when you have enough magicka Degeneration. Reapply the Barbed Trap 1.5 seconds before it runs out, that way you will have a 100% uptime on the Minor Force buff.
Between reapplying damage over time effects you want to spam Crystal Fragments as much as possible. It might be a bit difficult to weave light attacks with Crystal Fragments at the start, but you should get used to it eventually.
Start of the rotation:
Prebuff with everything > Daedric Prey > Weapon Swap > LA > Unstable Wall of Fire > Weapon Swap > LA > Crystal Frags > Continue dynamic rotation
Please watch the video with the timestamp below to see the full parse.
In the video you can also see a camera pointing at my keyboard and the mouse. I use basic 1-5 skill buttons and I weapon swap on the mouse side button. I used the Corsair Strafe Keyboard and the Corsair M65 RGB Ultra Mouse. You can find my full setup specs in the Alcasts PC Specs Article.
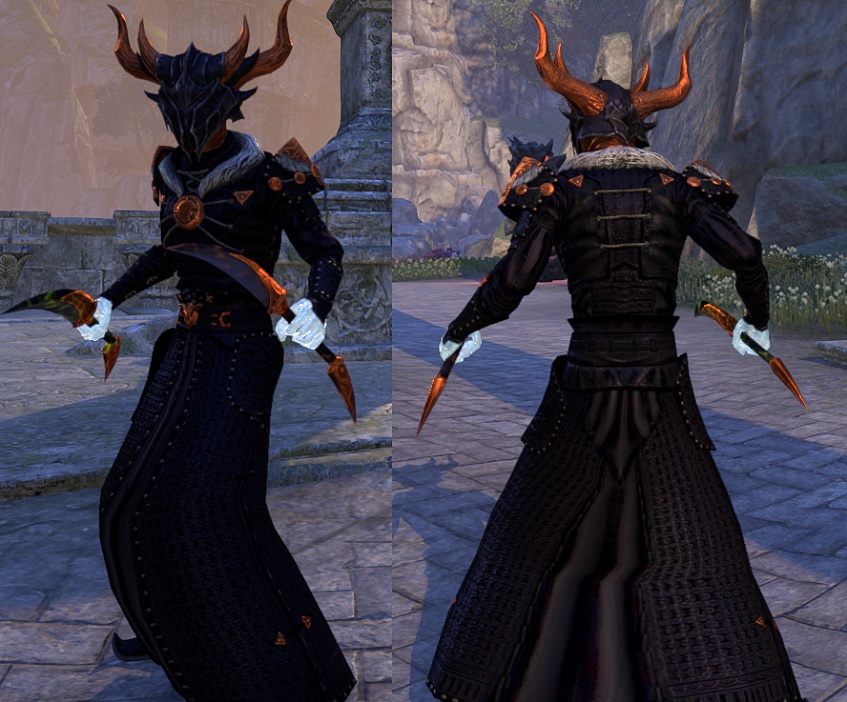
Sorcerer Outfit
Lets take a quick look at the outfit of the Sorcerer character in ESO.
- Ironclad Sarcoshroud hat
- Moongrave Fane light chest, shoulder, pants, hands, belt, boots
- Abnur Tharn’s Dagger weapons
- Crystalfrost skin
- Void Pitch and Marschnettle Titian dye
I hope this article about the Sorcerer DPS Target Dummy Parse in ESO (Elder Scrolls Online) could help you understand the whole thing a bit better. If you have any further questions you can always join our community partner Discord server.