

Welcome to the Advanced ESO Tank Guide. Tanking in ESO is quite different than other MMORPGs. It can be a game of managing resources, controlling dozens of enemies, avoiding high bursts, buffing and debuffing all at the same time in certain situations. You won’t be dealing any damage but your buffs and debuffs will increase the total group DPS by a lot and that’s what tanks do in ESO. We will also take a close look at the best tank class in ESO.
ESO Tanks buff and debuff to increase the total damage output. So we could say that tank is a support role. Combat is extremely fast paced and so should be your decision-making. This leads to an exciting gameplay style. You will have to make decisions in a split second, move out of AOEs in a certain way and do a ton of different things to stack up all the enemies, all while managing resources and surviving.
If you are interested in a beginner guide I can highly recommend checking out the Beginner Tanking Guide Article.
Table of Contents
- Controlling & Placement of Enemies
- Damage Mitigation, how does it work?
- Resource Management
- Off Tank and Main Tank
- Tank Sets
- Traits and Enchantments
- Addons for Tanks
- Support as a Tank
Tank Builds for all ESO Classes:
- Dragonknight Tank “Catalyst”
- Nightblade Tank “Siphoner”
- Sorcerer Tank “Capacitor”
- Templar Tank “Paladin”
- Warden Tank “Frostbite”
- Necromancer Tank “Colossus”
- Arcanist Tank “Sanctum”
Controlling & Placement of Enemies – ESO Tank Guide
Let’s first talk about controlling and placement of enemies in the ESO Tank Guide. This is the spot where you are still wondering how do we handle trash packs if there are no AOE taunts for tanks in ESO. We do things a lot differently here, we don’t taunt everything. ESO is designed in a way that most enemies in trash packs deal significantly less damage compared to others. They are weak and don’t need attention from tanks. A DD and/or Healer will be able to take a beating from an average trash pack enemy easily. But it doesn’t mean we will simply just let them run around hitting our allies.
First of all, one important thing you need to know is, Damage Dealers best damage source is their ground based AOEs. They tend to be somewhat small and need precise aiming in order to hit every enemy. So our main goal while tanking a trash pack is to stack these enemies as tightly as we can. We can do it in different ways depending on the content.
In 4 man content, enemies are usually not immune to Crowd Control so tanks can use CC (like stuns or roots) on them. First thing you need to know about it is what we call “pull” abilities. Dragonknights can use Unrelenting Grip aka “Chains”, Wardens can use Frozen Device aka “Gate” and other classes can use Silver Leash to pull enemies to themselves. This way, we can simply pull archers and mages that attack from range and stack them in the melee enemies so they take damage from the ground based AOEs.
In 12 man content, things are different. There are “elite” enemies that are immune to CC effects, they cannot be pulled, snared, stunned etc. Under these situations we basically don’t use any of the pull abilities. Most enemies have a certain range for their attacks. If you get out of this range, they will have to follow you and that’s exactly how we stack them. In 12 man content, your group will usually have 2 tanks. While one of them is holding the melee enemies, the other tank can taunt ranged enemies and stack them on the melee ones.
As tanks we want to stack most of the enemies. Once that is done we have to keep them there, there are a few ways to do this. The first and most effective option is a root. Dragonknights can use Choking Talons, Wardens can use Gripping Shards, Sorcerers can use Encase. Sadly, there are no other guaranteed AOE roots for other classes. Elemental Blockade applies root to enemies who have the chilled status effect on them and it makes the skill one of the most reliable ways to AOE root from the ones that are not guaranteed. It also applies a huge 60% snare on every enemy in it. You can also use AOE stuns such as Time Freeze but they work only once due to how CC immunity works. When you stun an enemy, they get CC immunity for 7 seconds, making you unable to stun them again for the duration.
Damage Mitigation, how does it work? ESO Tank Guide
Damage mitigation bonuses work multiplicatively in ESO. So we can say it’s impossible to reach 100% mitigation as an ESO tank and the more you have, the less benefit you get. To make it more clear, if you are getting 50% mitigation from resistances and 50% from blocking, you will have 75% mitigation instead of 100%. This is the main reason it’s not a very good idea to invest a lot into mitigation. We mainly invest just enough to be able to take the biggest hits, rest of it goes into support and sustain.
Resistances – ESO
This is one of the important stats for a tank obviously but don’t worry too much about it. There is a hard cap at 33000 which gives 50% mitigation and after this point, you have no benefit at all. Any single point of resistance after that is useless unless there are enemies that reduce your resistance with a debuff which happens very rarely. Spell Resistance reduces the damage you take from Magic, Flame, Shock and Frost damage while Physical Resistance reduces the damage you take from Physical, Poison and Disease damage. Keep in mind that Bleeds and Oblivion damage completely ignores resistances.
Block and Roll Dodge
Block gives us 50% mitigation and this number can be improved with specific passives while Roll Dodge completely prevents all damage. Keep in mind that there are some attacks that are not blockable and some attacks are not dodgeable. These are mostly AOE attacks so it’s better to just get out of them if they hit really hard. Once you get hit by a damage over time ability, you will still get damage while dodging. Roll Dodge is especially important since it can allow you to completely prevent the damage from a really high damage attack. Bleeds and Oblivion damage ignores all block mitigation.
Resource Management – ESO Tank Guide
Resource management is one of the most important things while playing a tank. If you drop to 0 resources, you are likely going to die.
Sustain for ESO Tanks
Right, this is the key part of the ESO Tank Guide. A tank without resources is as good as a player who gets disconnected. There are a ton of ways to keep your resources up.
First and most important, don’t overcast. Abilities like Pierce Armor and Heroic Slash will get you to zero Stamina in no time if you spam them. There is no reason to spam them over and over as long as their effects are still active. They last quite a while, let those buffs and debuffs run as much as you can before applying again. This part applies to every skill you have, Stamina or Magicka.
Use your class passives and abilities. Read all the tooltips and try to understand the synergy your skills have with passives. For example, a Dragonknight can activate 2 passives at once with one single button. Casting any Earthen Heart skill will give you 3 Ultimate every 6 seconds from Mountain’s Blessing passive and restore a thousand Stamina from Helping Hands passive. Faster Ultimate regeneration means better sustain thanks to Battle Roar passive so casting an Earthen Heart ability provides a direct and indirect sustain boost. A Warden can heal allies with Green Balance abilities which will activate Nature’s Gift passive to increase sustain. Try to learn how to link and synergize your passives with the abilities you have.
As an ESO tank you have to choose weapon and jewelry enchantments correctly. Weapon enchantments can play a big role in your sustain. If you have Stamina issues, you can use an Absorb Stamina enchant, same with Magicka. When it comes to jewelry enchants, it can differ depending on the fight. It’s good to know what you are spending your resources on in different fights. Most likely, it will be blocking that eats your stamina so going with Block Cost Reduction enchants is almost always a good choice. There are some fights where we don’t block at all so these enchants can perform really bad in those. So it’s highly recommended to have different sets of jewelry that provide different kinds of sustain. Magicka Recovery, Stamina/Magicka Cost Reduction enchants are all good choices. Potion Cooldown Reduction enchants can be quite amazing for Argonian tanks thanks to their racial passive.
Use synergies, in the Undaunted skill line, we have a passive called Undaunted Command. This passive provides resources whenever you activate a synergy. There are also two synergies that will help your sustain by a lot. These synergies are usually provided by your healers through Spear Shards and Necrotic Orb abilities. The synergy they provide restores 4k of your highest stat pool so it’s a common suggestion to have more Max Stamina than Max Magicka. There are some builds that have more Max Stamina on the front bar and more Max Magicka on back bar to utilise this synergy the best they can.
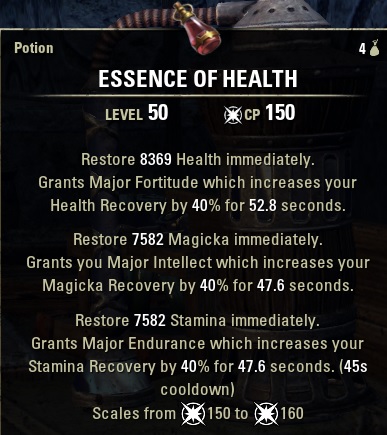
Potions for ESO Tanks
The first one you will see most players are using is Tri-Stat potion. It basically restores a huge amount of Health, Stamina and Magicka. It’s pretty much always useful to have. This part is especially important if you play an Argonian since they have a built-in tri-stat potion effect in their racial passive. If you play an Argonian, you can basically choose to run any potion and have the tri-stat potion effect on top of it. You can obviously use tri-stat potions as an Argonian as well but that would obviously be overkill. Make sure to level your Alchemy skill line and get the Medicinal Use passive to increase the durations of buffs you get from potions.
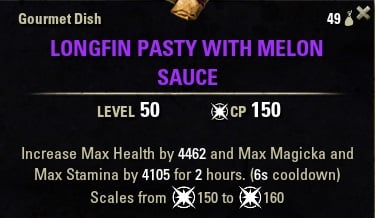
Food Buff for ESO Tanks
As a tank in ESO you should get your hands on proper food. They are not expensive. Best one to start with and most popular in most cases is the tri-stat food. It provides Max Health, Max Stamina and Max Magicka. As a tank, you need all stats and this food is perfect for that. It can also depend on your build. There are some builds out there that will get more benefit from running Magicka Recovery drinks etc. Again, it all depends on your build but tri-stat food is the best choice for most cases.
Main Tank and Off Tank – ESO Tank Guide
In 12 man raids there is usually a Main and an Off Tank. The Main Tank is what we call a tank that holds the main boss. Off Tank is the one that holds the extra enemies during the fight. There are usually 2 tanks, one of each but there are strats where you might have 2 Main Tanks with 1 Off Tank or 1 Main Tank with 2 Off Tanks. Main Tanks are usually tankier than Off Tanks due to high incoming damage from bosses. Extra enemies (adds) usually deal lower damage and allows players to provide more support with Medium Armour sets if wanted.
Tank Sets
As said earlier, you want to build for support and the best way to do it is using sets that provide that. There are few sets that shine above others but we will mention all that are worth mentioning.
Advanced Gear
Ebon Armory: This set will provide 1118 Max Health to all allies before the boosts. That means it is actually more than what it says. On your healer who has 1 piece Heavy Armour, it can give around 1600 Max Health while it will give around 1900 Max Health on the other tank due to difference in Max Health bonuses. Now, multiply those numbers with the number by 12 and you’ll see how much benefit a single set can provide.
Roar of Alkosh: Penetration in this game works in a different way. It increases the damage output of your allies by a percentage. That means if your DDs are strong and deal high damage, it will benefit them more compared to an average or weak DD. Knowing that we have 8 DDs in a trial scenario, this set makes a huge difference in total group DPS. Keep in mind that Alkosh is a medium armour set so mostly used with jewelry and weapon.
Torug’s Pact: As you know, we use Crusher enchants on our weapons pretty much all the time. Torug’s Pact increases the effectiveness of your enchants and reduces their cooldown, giving your group another way to increase their damage by reducing enemy armour values even more.
Akaviri Dragonguard: Here is an another set that provides damage boost for your team but in an indirect way. It reduces the cost of your Ultimates by 15%, allowing you to use Aggressive Horn more frequently and increasing the uptimes of Major Force. It’s a very tanky set as well so it’s a really good choice if you want to keep your tankiness while still providing support.
Powerful Assault: It is a medium armour set that is mostly used by Off Tanks combined with Alkosh. It gives Weapon and Spell Damage to small amount of allies when you cast an Assault ability. It’s mostly used when you want to push out as much damage as possible. Mostly used with Vigor to activate the set so you can combine the damage boost with some off healing.
Monster Sets
Lord Warden: Arguably the best protection set for tanks. It gives almost 3k resistances to you and 4k more to you and allies in range when activated. It’s the best if you want to be tanky while making your group tanky. It activates on any damage taken without any other requirements so make sure it procs where your allies are.
Earthgore: This one is more of an automatic emergency. When you heal yourself or an ally while under 50% Health, it activates and heals by a ton over time. It doesn’t give a tanky bonus with the 1 piece but it definitely can be the line between life and death.
Bloodspawn: The traditional ultigen set. This one is the only monster set choice that increases your group DPS, indirectly. As it gives you Ultimate, you can use Aggressive Horn more frequently for more Major Force uptime.
Sentinel of Rkugamz: This set can also be very good in case you have stationary fights as it restores a lot of resources. It can give resources back to multiple group members when they stand in the glowing AoE of the spider.
Symphony of Blades: This set is often used in combination with the Blood Altar skill which is an AoE heal over time. The moment someone drops below 50% they will benefit from the resource boost.
Traits and Enchantments for Armor and Weapons
Armor
When we look at traits for armour, you’ll see there are many such as Infused, Reinforced, Nirnhoned and Sturdy. But, only one of them makes sense to use and that’s Sturdy. When you are at the CP cap, you’ll see that you have so much defense, mitigation and healing that you won’t get any benefit from Reinforced and Nirnhoned. We can easily reach resistance cap (33k) thanks to CP so Reinforced and Nirnhoned become useless. Infused is still nice if you are not blocking a lot but as you will be blocking a lot in most content, you want to have full sturdy as it makes the most noticeable difference.
Weapons
You usually want to use a S&B + Destruction Staff setup. The enchantments on 1H Weapons are cut in half, so you want to make sure to place your weakening enchantment on the S&B bar and the crusher enchantment on the backbar with the 2H Destruction Staff. That way you can provide better debuffs on the enemy because your crusher enchantment will have full effect.
Addons for ESO Tanks
I can highly recommend using MINION addon so you can faster and easier download all the addons, its all automated. https://minion.mmoui.com/
- Tank/Untaunted: Both are really good. Tank shows a taunt timer on your crosshair for the target you are looking at. Untaunted shows the taunt timer for different enemies at the same time but not in middle of your screen. Use at least one if not both.
- Cooldowns: This addon will track your set cooldowns but more importantly, it tracks the cooldown of your synergies. This will allow you to have amazing uptime on Alkosh by calling out when you need synergies.
- BuffTimers/Srendarr: Both are amazing buff/debuff trackers. Use whichever you like better.
- Combat Metrics: Your best way to learn how your uptimes are. Let’s you try out different strats and see if you improve in terms of uptimes etc.
- Dressing Room: Lets you quickly swap gear and skills between fights.
- Champion Point ReSpec: Lets you quickly swap CP setup.
- JoGroup: Amazing group frame that shows if players in your group have Warhorn buff, how much food duration they have left, their Max Health, if they are getting a res or not etc.
- RaidNotifier: Not only amazing for the notifications but also for tracking your allies’ Ultimates so you can call out Warhorns.
- RaidBuffs: Shows the debuffs applied to boss, also works if there are multiple bosses.
- Warhorn Tracker: One of the most important addons for all support players. It shows the Warhorn duration even if you didn’t get the buff. This is especially important to have in fights where you are away from others such as Asylum Sanctorium.
Support as a Tank
Importance of Buff and Debuff Uptimes
As we said before, Tank is a support role and your main support comes from your gear, enchants and skills but you can’t just spam your skills and hope to get consistent uptimes on your buffs and debuffs. It’s really important to have consistent and high uptimes on them. For example, if you are getting really low uptimes on Alkosh and Crusher, it’s better to have your Damage Dealers use the Lover Mundus Stone and/or gear sets that give Penetration. It’s better to use something else if you can’t get high uptimes.
How to get Good Uptimes on your Buffs
Crusher
This enchant doesn’t depend on other players unlike Alkosh so you can get nice uptimes on this by yourself following few tricks. First of all, the most important information you need to know is that Crusher Enchant has a 9 seconds of base cooldown and Infused weapon reduces it to 4.5 seconds with 5 seconds of duration. That means you can keep a 100% uptime on it if you time your enchant procs correctly.
The easiest way of doing it requires a Destruction Staff. Frost or Shock staff of your choice. We need Elemental Blockade on our back bar as it procs your enchantment on the weapon you cast it with. So you can cast Blockade and swap to your One Handed and Shield bar and watch the Crusher procs. Most important benefit of this strat is that you can apply Crusher while away from boss or stunned. Even though it is extremely easy to follow this way, it has disadvantages as well. The Crusher will go to the closest enemy to you that stands in your blockade so you have to make sure nothing stands between you and boss if you are going to choose this as your main way to apply Crusher. Second disadvantage is that it requires you to spend Magicka but also helps Off Balance uptime if using Shock Staff.
Once again, enchantments are more effective on two handed weapons, that is why we want the crusher enchant on the Destruction Staff bar.
Alkosh
Right, this here can be tricky because it depends on your allies and their choice of class but you can increase your uptime on it by calling out what synergy you need and standing in correct places to get those synergies. Obviously, calling out synergies requires good teammates that can actually give you a synergy when you ask for it. For example, an average healer won’t be able to give you a shard or an orb when you ask for it but an experienced healer will make sure you have the synergy under your feet even before you call for it.
You also need to stay in the correct places to get those synergies. For example, a Conduit synergy won’t come to you most of the time. You will have to go under the boss and take it yourself. A Warden using Harvest synergy won’t put it exactly under your feet. The synergy only pops up when you stand right in middle so you will have to move. So Alkosh uptime is a combination of your own movement, call outs and how good your teammates are. You can’t force it to be good from the first day, it comes with practice and playing as a group. Don’t worry about it too much if you can’t get high uptime on Alkosh, keep practicing with your group and improve, it will come on its own.
Healing as a Tank
Usually, there will be a healer, two of them in raids. So self healing is mostly not a concern for tanks. But, there will be some fights where you will have to self heal. Maybe to reduce pressure on healers or because there are no healers. When you find yourself in such a situation, you need to know how to heal correctly. Most tanks usually have a burst heal on their bar such as Green Dragon Blood. This works in both situations as it’s usually easier to just press one button to keep yourself alive.
There are other ways as well such as using Heal over Time skills and items, Resolving Vigor being the best example. Lingering Health Potions are also really good for keeping yourself alive. If you use Infused Potion Cooldown Reduction glyphs on your jewelry, you can swap between two potions and have their full effect. For example, Lingering Health + Vitality potion will give you the 47 seconds of Heal over Time with 16 seconds of Major Vitality while the other potion, Restore Health + Vitality will give you a huge burst heal while keeping the Vitality buff up. You can swap between these during the combat and have insane self healing with 70%+ Major Vitality uptime. If you are an Argonian, this will be a lot better since you also get resources with each potion use.